Profile Manager
Overview
A Profile is an output configuration that tells Erizos Studio where your graphics are rendered. Each profile is a named set of outputs (render engines) organised into channels, so that when you take a page to air, Studio knows which engines to send it to and whether each one is a preview or a program output.
Typically each physical studio has its own profile. For example, a facility with two control rooms might keep a "Studio A" profile and a "Studio B" profile, each pointing at the render engines wired into that room.
Info
Users vs. Profiles
A User is defined by its permissions for working in the Erizos Studio environment.
A Profile is an output configuration - usually each physical studio has its own profile.
There is no hierarchy between users and profiles; they are managed independently.
The Profile Manager (also called the Profile Editor) is where you create, edit, rename, duplicate and delete profiles, add the outputs and channels they contain, and confirm that Studio can reach each render engine.
Opening the Profile Manager
- The Profile menu is located in the bottom-left corner of the Erizos Studio client interface.
-
Click the menu and choose Edit Profiles.

The Profile Editor opens in a new modal window.
The Profile Editor layout
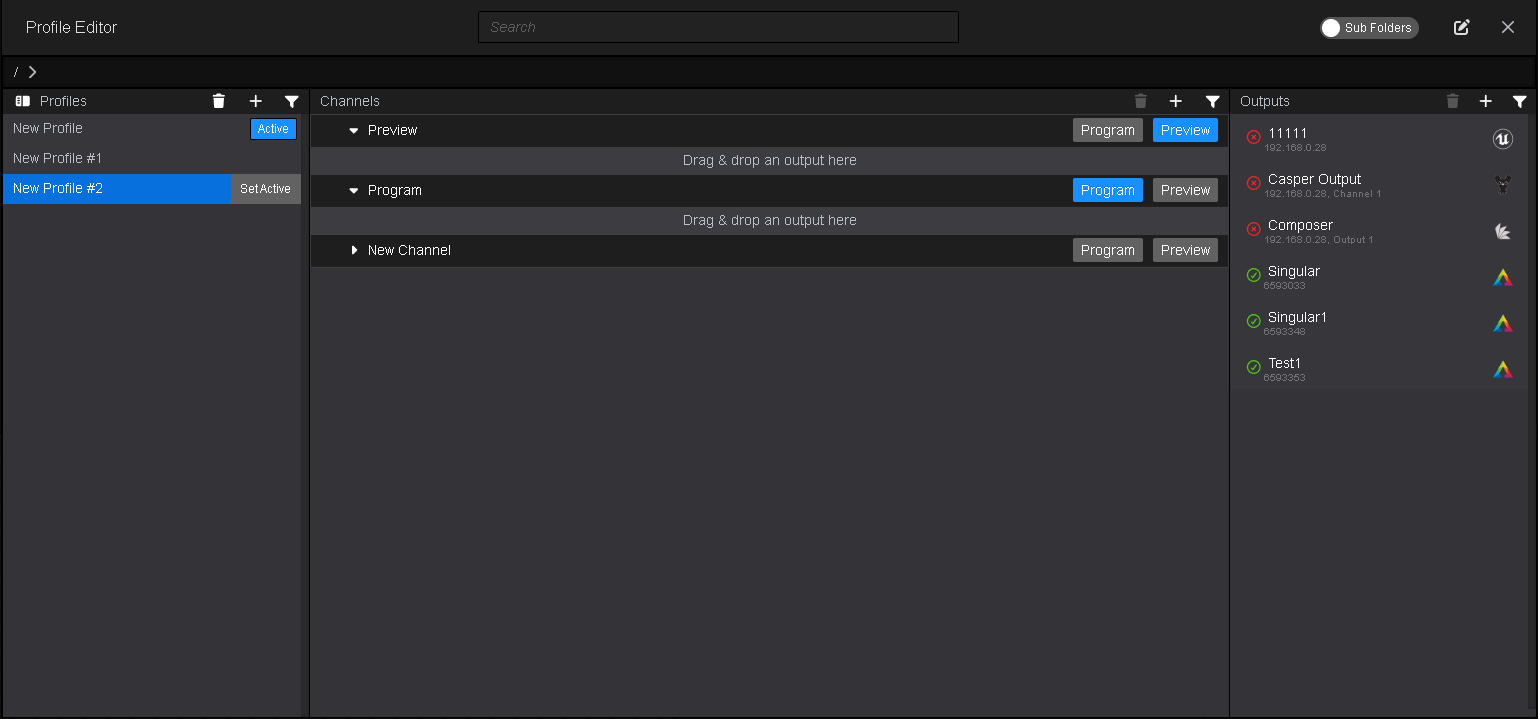
The editor opens on the list of profiles, with the channels and outputs of the selected profile beside it:
| Column | Purpose |
|---|---|
| Profiles (left) | Lists every profile in the current folder. Select one to work on it. |
| Channels (centre) | The channels that make up the selected profile. Until you select a profile it reads Select a profile to see the channels; use to create a channel. |
| Outputs (right) | The render engines available to the profile. Each output points at a configured render engine by address and port. |
Along the title bar of the window are three more controls:
- Search - searches profiles and outputs across the whole editor.
- Sub Folders - a switch. Turn it on to include the profiles of the sub-folders of the current folder in the list.
- Edit mode - a toggle. It turns blue while it is on, and adds the tick boxes used for working on several profiles, channels or outputs at once.
Note
Before a render engine can be added as an output it must first be configured in Studio. See Configure Render Engines.
Organising profiles into folders
Profiles can be organised into folders, but the control is easy to miss.
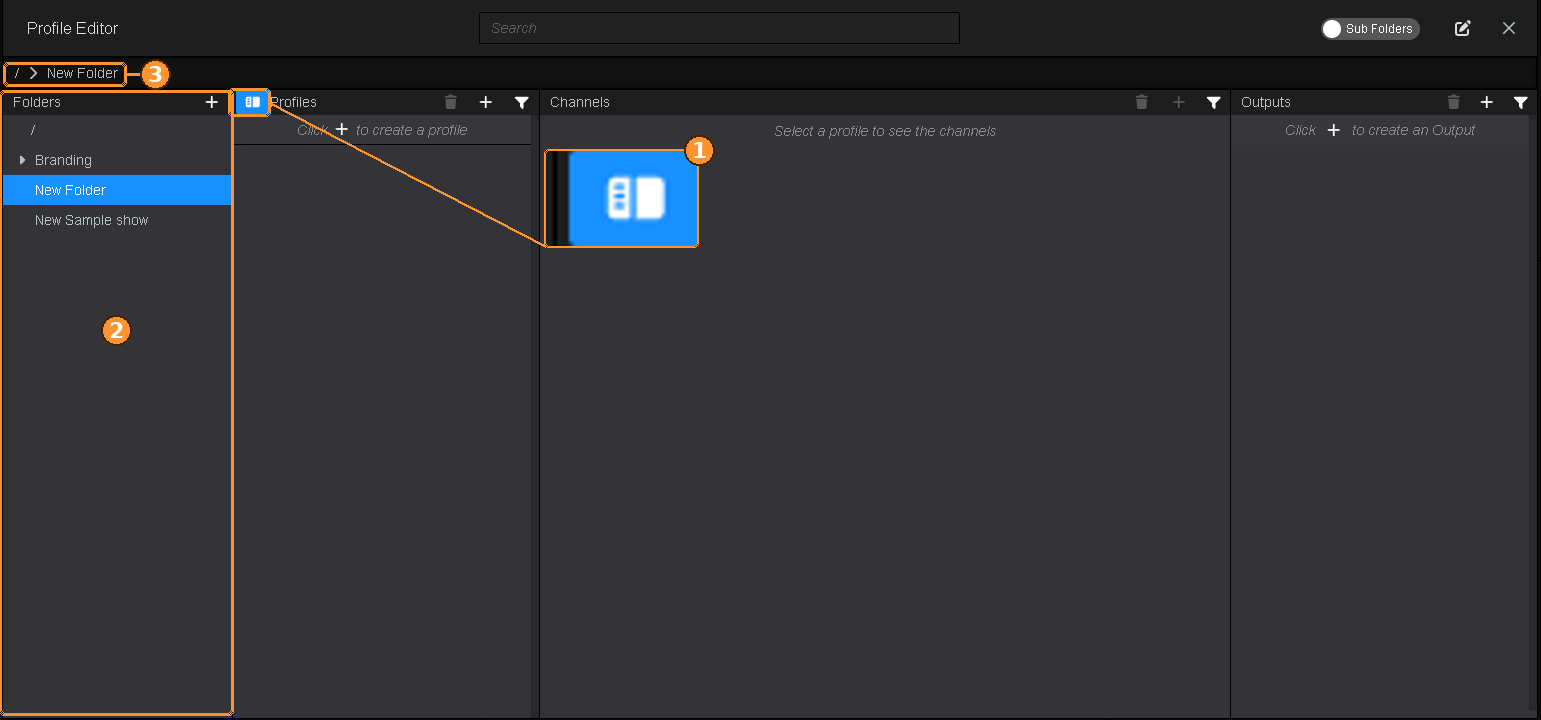
- Folders panel button - the small panel button to the left of the Profiles header. Click it to show or hide the Folders column. Studio remembers the choice for next time, and it does the same for the Sub Folders switch.
- Folders column - create folders with the button, then drag your profiles into them.
- Breadcrumb - shows the folder you are currently in, starting from the root (
/).
There are two reasons to use folders:
- Organisation - keep related profiles grouped together rather than in a single flat list.
- Permissions - using the permission system, you can limit a user, user group, or user role to a specific profile folder. This restricts which profiles (and therefore which render engines) that user is allowed to output to. See Users And Roles.
Working with a profile
Right-click a profile for its menu:
- Rename Profile - renames it in place. You can also double-click the name to edit it. A name that is already used in the folder is rejected, and the reason is shown on the icon beside the field.
- Duplicate Profile - creates a copy of the profile under a new name, and opens the new name for editing.
- Delete Profile - deletes it.
- Go to Folder - shown when the profile is listed from a sub-folder; it opens that folder.
Each entry is permission-checked separately, against the folder the profile is in: renaming needs Profiles → Update, duplicating needs Profiles → Create and deleting needs Profiles → Delete.
The toolbar above the list holds Delete Profile, Create new Profile and the filter. In edit mode, Delete applies to every ticked profile.
The profile Studio is currently using is marked with an Active tag. Select any other profile and click Set Active to switch to it.
Outputs and connection status
Each output relies on two connections: the Output itself (the render engine) and the Agent running on that machine. When you add an output, Studio attempts to connect to both and shows the result as an icon in front of the output name:
| Indicator | Meaning |
|---|---|
| Connected. Both the output and the Agent answered. | |
| One of the two failed - either the output or the Agent. | |
| Neither the output nor the Agent answered. |
Hovering over the output shows the reason as a single line. It is one of:
Successfully connected to Output and AgentFailed to connect to AgentFailed to connect to OutputFailed to connect to Output and Agent
Note
Some outputs have no Agent. A Singular output whose address does not contain a ; is treated as agentless: only the output itself is checked, and the message is then Successfully connected to Output or Failed to connect to Output.
A failure usually means the render engine is not running in on-air/play mode, the Agent is not running on that machine, or a network issue is blocking the connection.
Channels: preview and program
Within a profile, outputs are assigned to channels. A profile has at most one Program channel and at most one Preview channel; any other channels are neither:
- Program channels are the live outputs that go to air.
- Preview channels let operators check a graphic before taking it to program.
Drag an output from the right-hand column onto a channel in the centre column to assign it. Use the Program and Preview buttons on a channel to give it that type. Giving a channel a type takes it away from the channel that had it, and clicking the highlighted button again clears it. See Program channels & Preview channels.
What you can do from here
- Create a profile - step-by-step in Creating a Profile.
- Add channels and outputs, and assign template default channels - covered in Profile configuration.