The Layouts Manager
Starting from version 3.5, the Layouts Manager lets you divide the Studio screen into configurable panels, choose which component appears in each, and save the arrangement as a named layout you can reopen at any time.
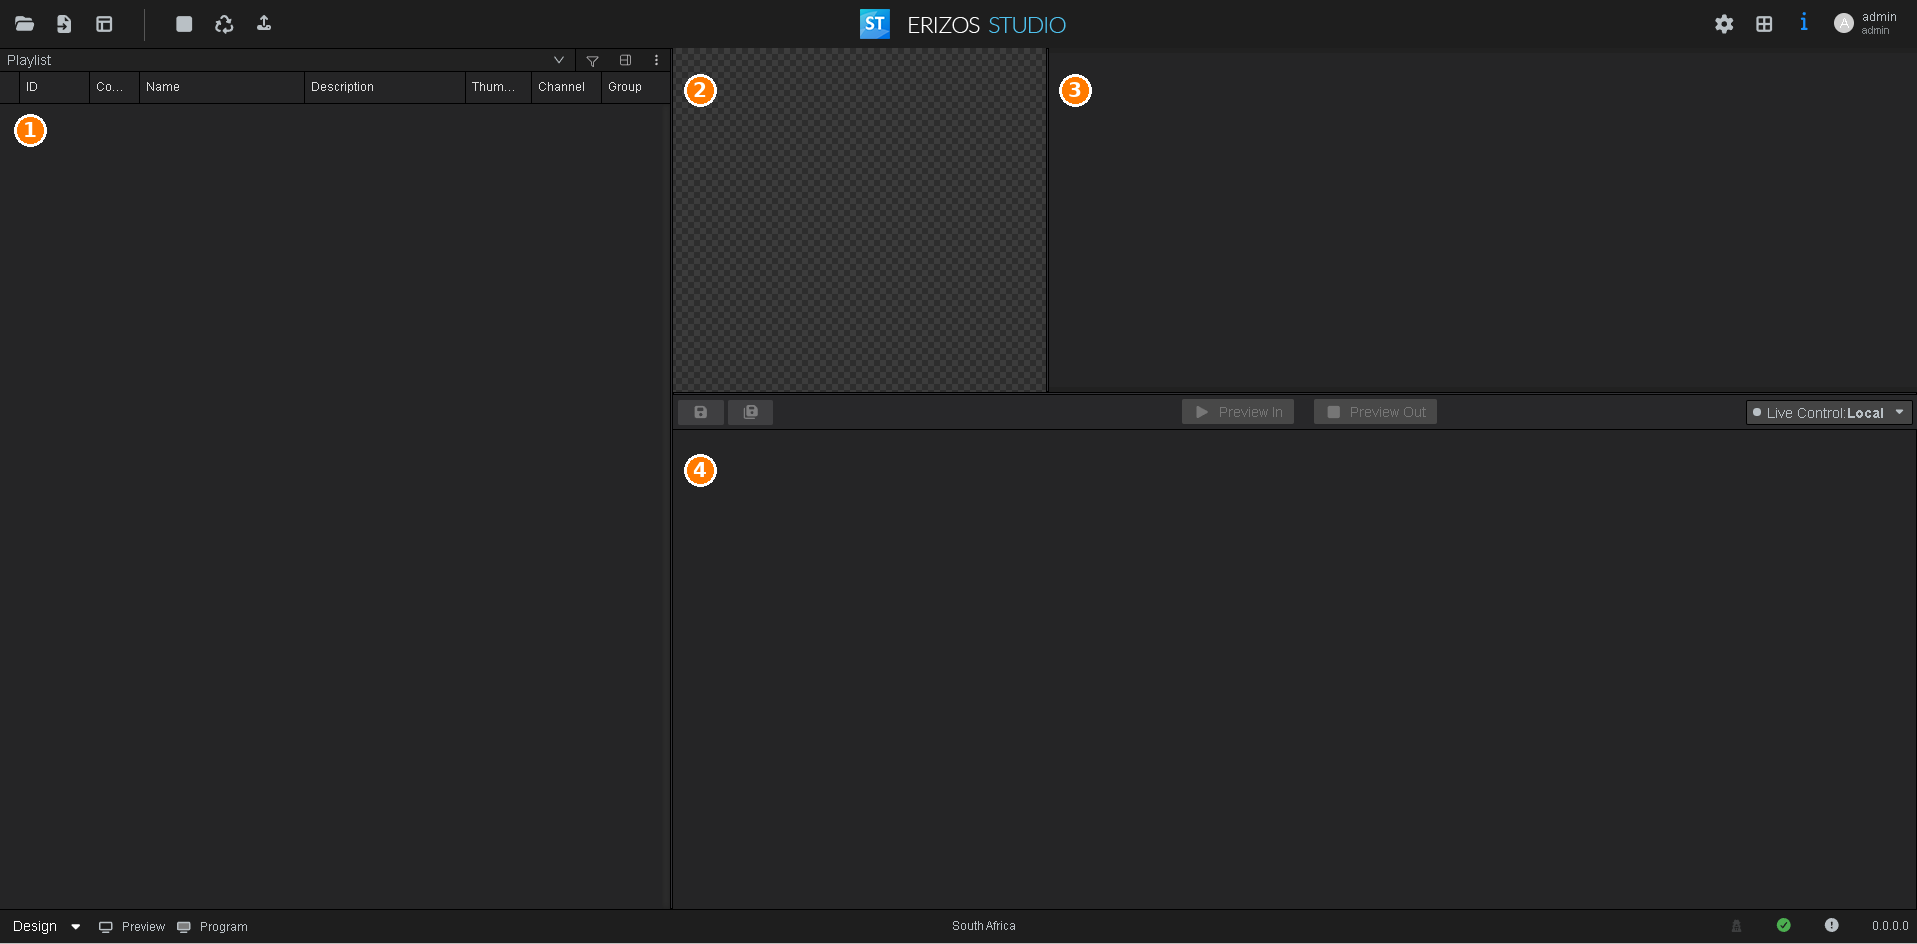
A layout is made up of panels, each showing a single component. The Studio Layout arranges the screen into:
- Playlist - the playlist for the current show.
- Preview - the preview window.
- Output Controls - the on-air / output controls.
- Payload - the page properties and fill-in form for the selected page.
Note
The Studio Layout also includes a Show UI panel across the top. Like the standard Show UI panel, it only appears when the selected show has a Show UI created for it.
The Layouts Manager interface
Everything starts from the Layouts Manager button in the top-left toolbar. Click it to open a short menu with two options.
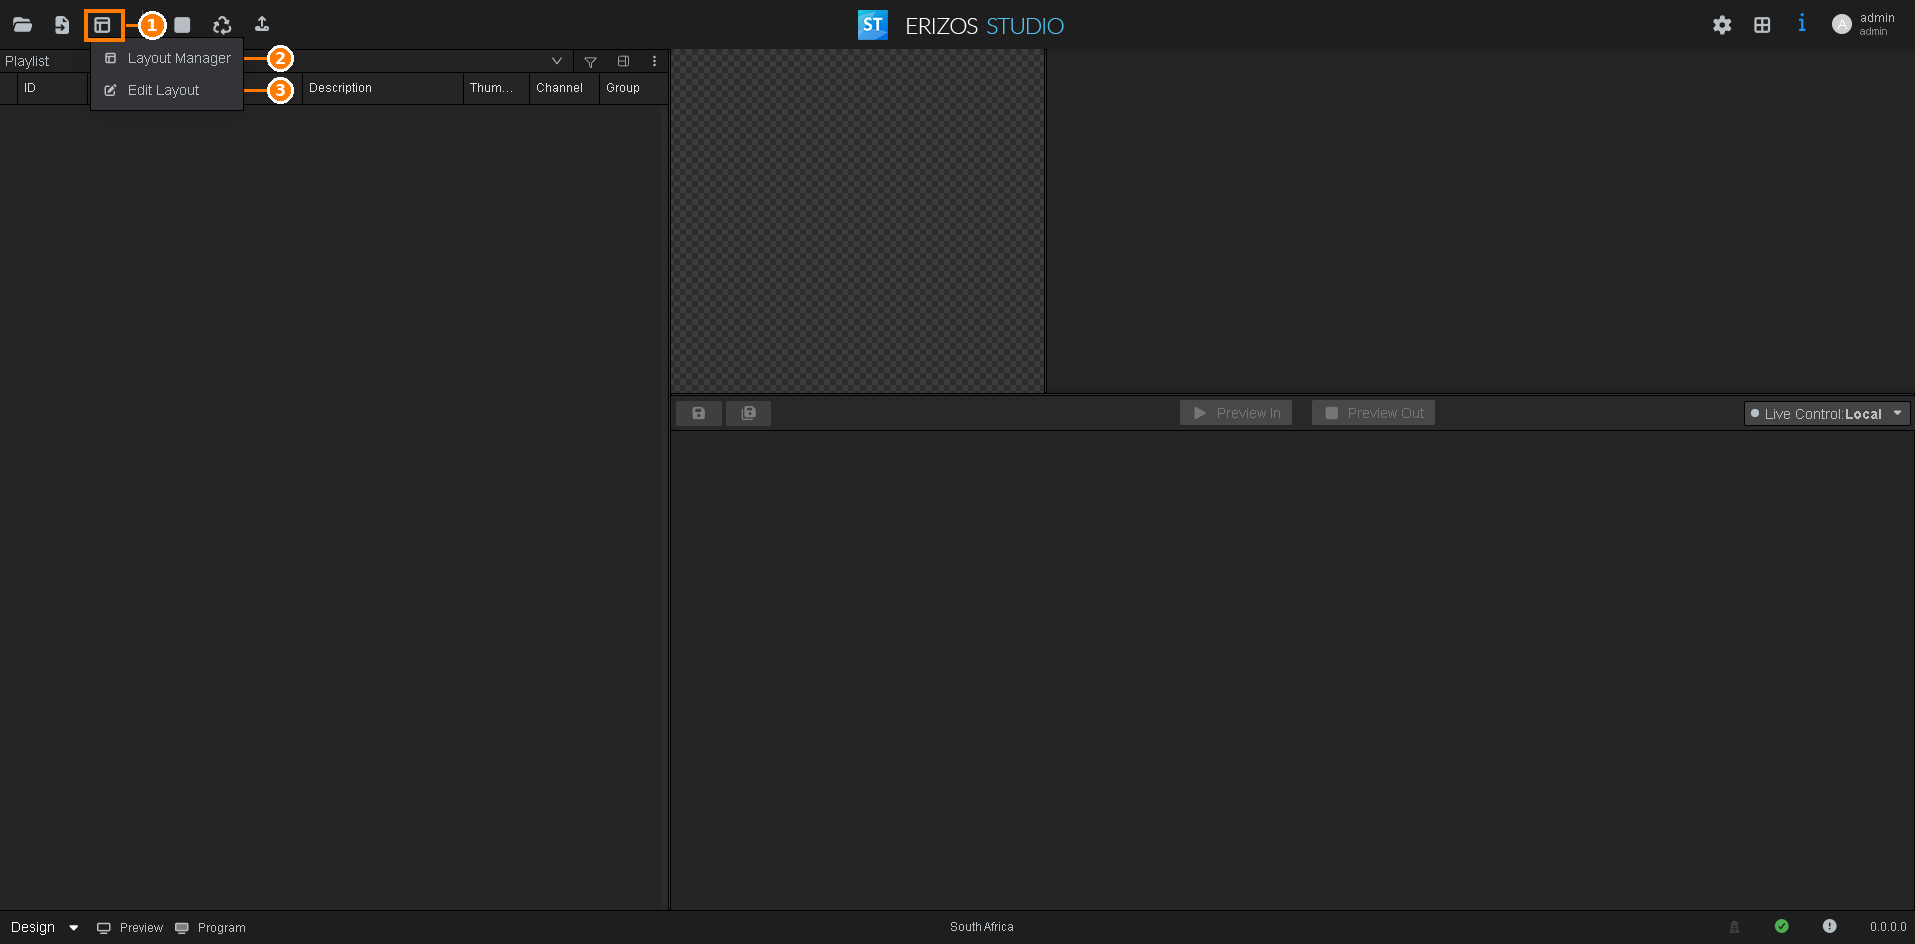
- Layouts Manager button - the layout icon in the top-left toolbar. Click it to open the menu.
- Layout Manager - opens the dialog where you browse, open, and organise your saved layouts.
- Edit Layout - toggles edit mode so you can make changes to the current layout: change panels, split the workspace, and save your changes.
The Layout Manager dialog
Selecting Layout Manager opens a dialog with two panes.
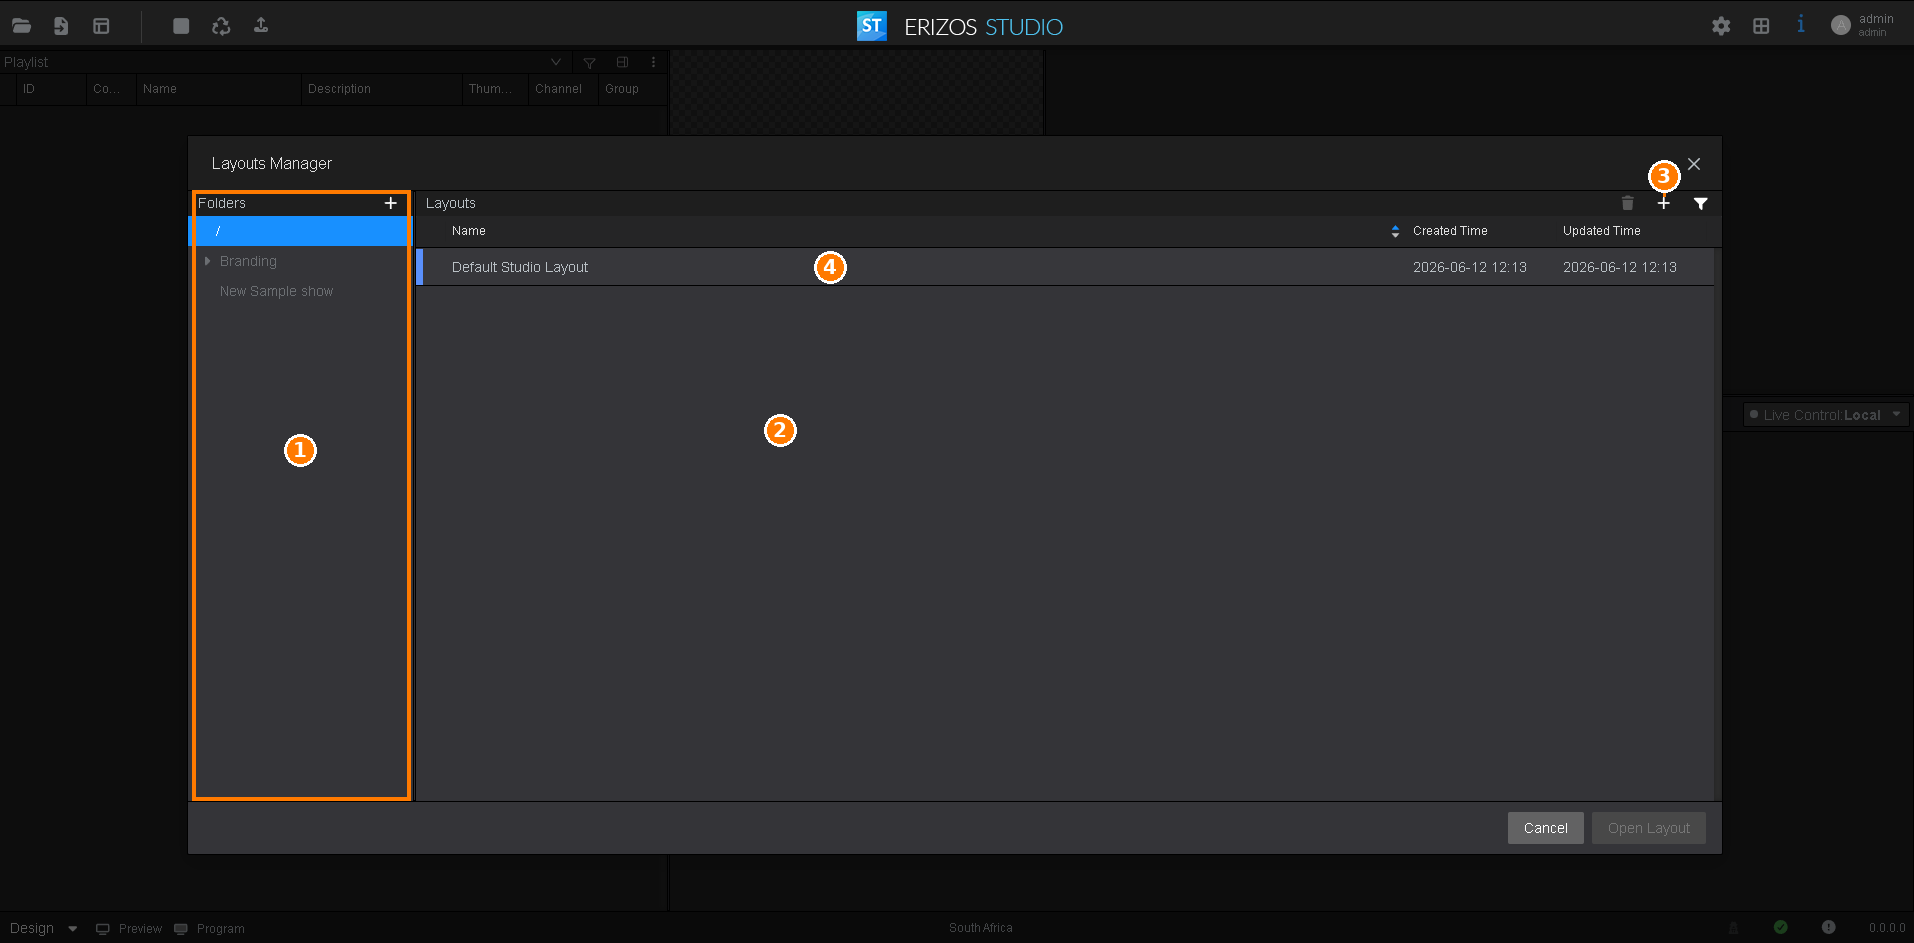
- Folders - organise your layouts into folders, in the same way as other
managers in Studio. Use the button to add a new
folder. The root folder is shown as
/. Drag a layout onto a folder to move it. - Layouts - the layouts contained in the selected folder, with Name, Created Time, and Updated Time columns. Click a column header to sort.
-
Layout controls:
Icon Description Duplicate Layout - copy the selected layout. Available when exactly one layout is selected. Delete Layout - remove the selected layout. Create Layout - create a new layout in the current folder. Filter - filter the list of layouts. -
A saved layout - select it (or double-click it), then click Open Layout to apply it, or Cancel to close the dialog without changing the current layout.
Renaming, duplicating and deleting
Right-click a layout for the same three actions - Rename, Duplicate and Delete - each of which is checked against your permissions for the folder the layout is in.
- Rename puts the name into edit mode; you can also click the name in the list to edit it in place. A name that is already used in the folder is refused, and the reason is shown on the icon beside the field.
- Delete asks you to confirm first, naming the layout - or the number of layouts, if you have selected more than one.
With the list focused, Del deletes the selected layout and F2 starts renaming it, without going through the menu.
Creating a new layout
Clicking the Create Layout button lets you choose the template for the new layout.
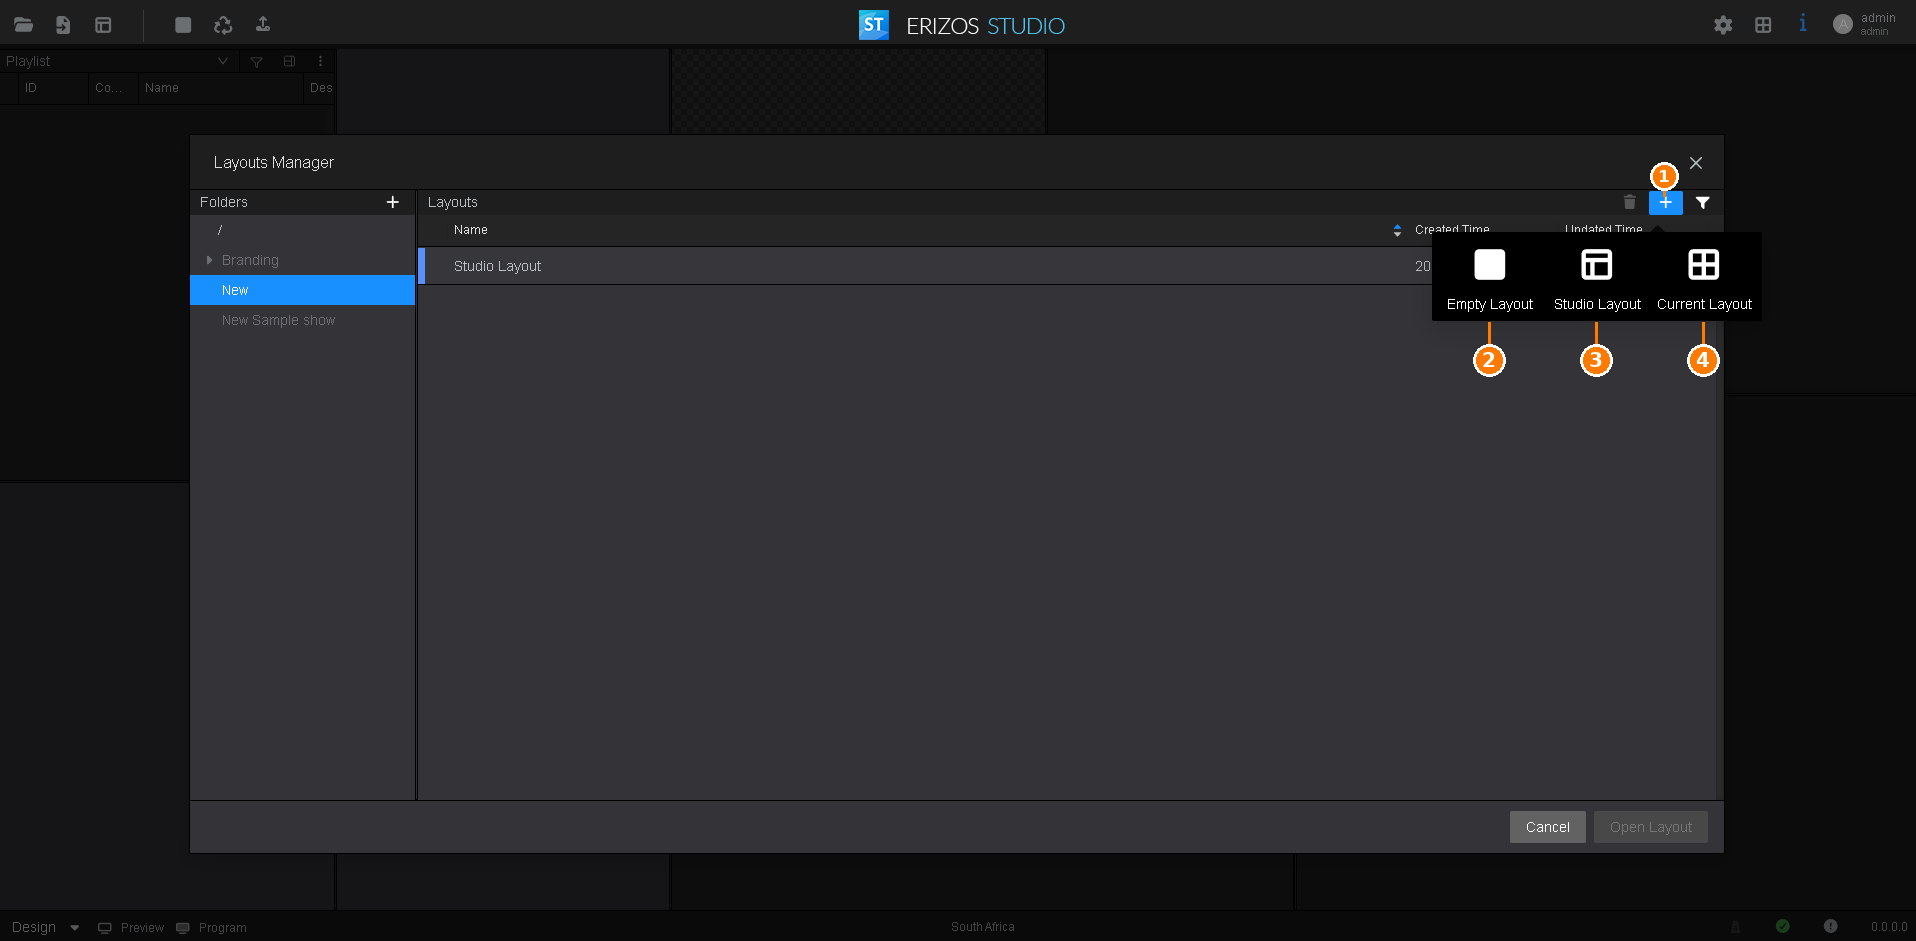
- Create Layout - click to choose the template for the new layout.
- Empty Layout - start from a single empty panel.
- Studio Layout - start from the standard Studio template.
- Current Layout - start from the layout currently open on screen.
The new layout is created straight away and its name is opened for editing, so you can type the name you want over the default.
Panel components
Every panel displays a single component, chosen from a dropdown.
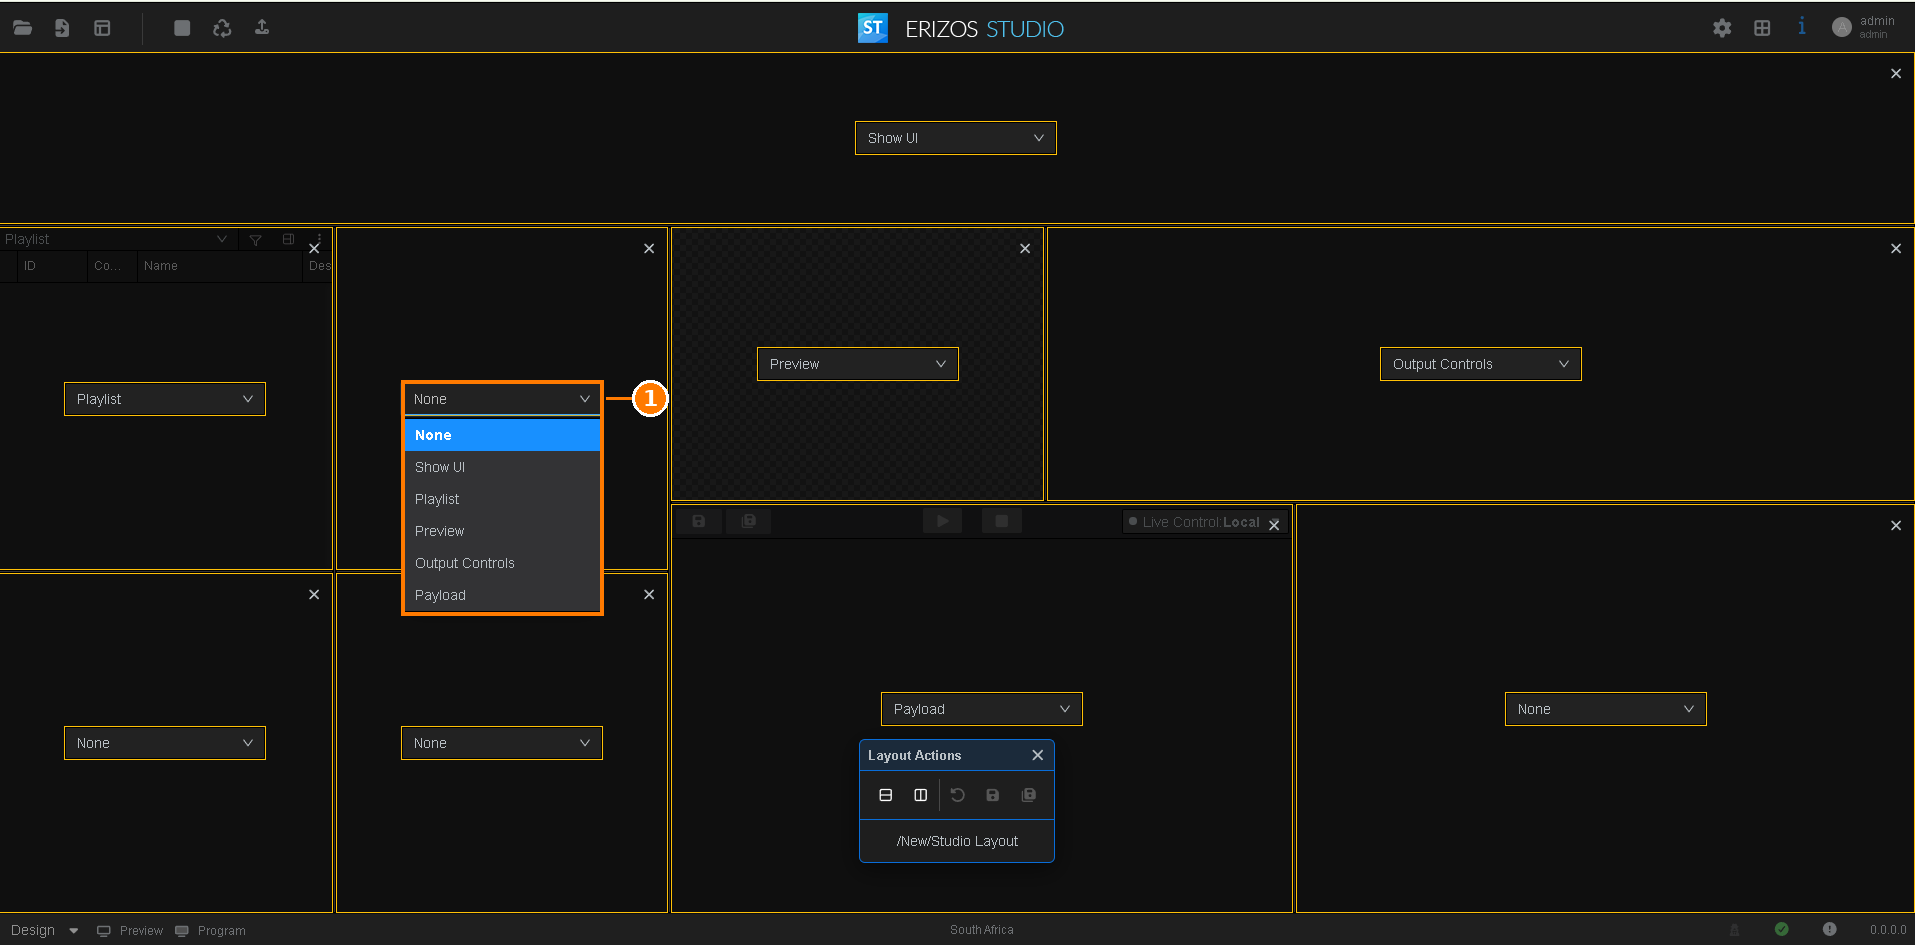
The available components are:
| Component | Description |
|---|---|
| None | An empty panel with no component assigned. |
| Show UI | The custom Show UI for the selected show (only shows content if a Show UI has been created). |
| Playlist | The playlist for the current show. |
| Preview | The preview window. |
| Output Controls | The on-air / output controls. |
| Payload | The page properties and fill-in form for the selected page. |
Note
Each component can only be used once in a layout. Assign a component that is already shown elsewhere and the panel that had it is set back to None.
Editing a layout
Choose Edit Layout from the Layouts Manager menu to enter edit mode. Each panel gains a component dropdown and a close button, and a floating Layout Actions toolbar appears.
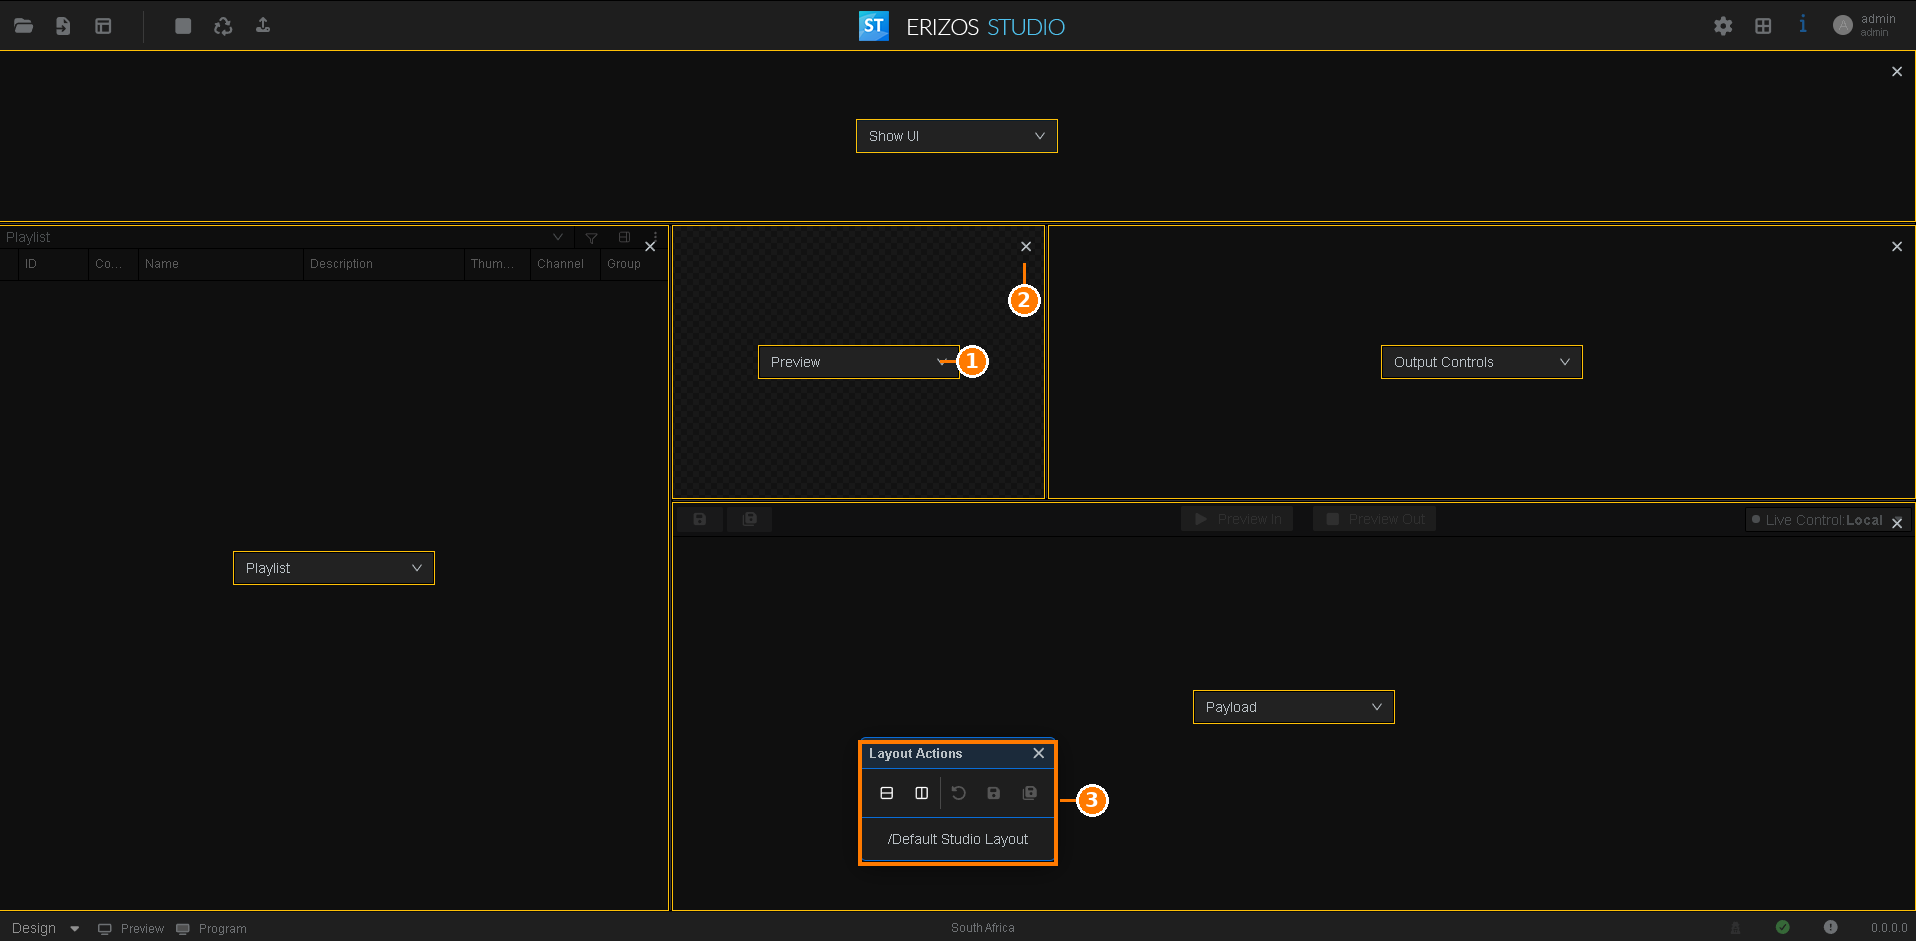
- Component dropdown - select the component to display in this panel. The panel updates immediately.
- Close panel - removes the panel, after asking Are you sure you want to remove this panel?. Hold Shift while you click to skip the question. The remaining panels expand to fill the space. The close button is not shown while the layout is down to a single panel.
- Layout Actions toolbar - the editing controls, described below. The name of the layout you are editing is shown at the bottom of the toolbar; drag the toolbar by its header to move it out of the way.
The Layout Actions toolbar
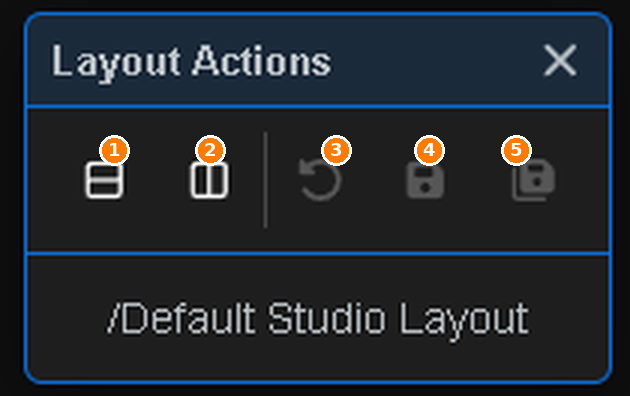
- Add horizontal splitter - split a panel into a top and bottom panel.
- Add vertical splitter - split a panel into a left and right panel.
- Reset to default - discard the changes made in this editing session.
- Save - save the current arrangement to the layout you are editing.
- Save as - save the current arrangement as a new layout. Studio then reopens the Layout Manager with the new layout selected.
Reset, Save and Save as stay disabled until you have actually changed something. If the layout on screen has never been saved, for example the built-in default, Save works like Save as.
Splitting a panel
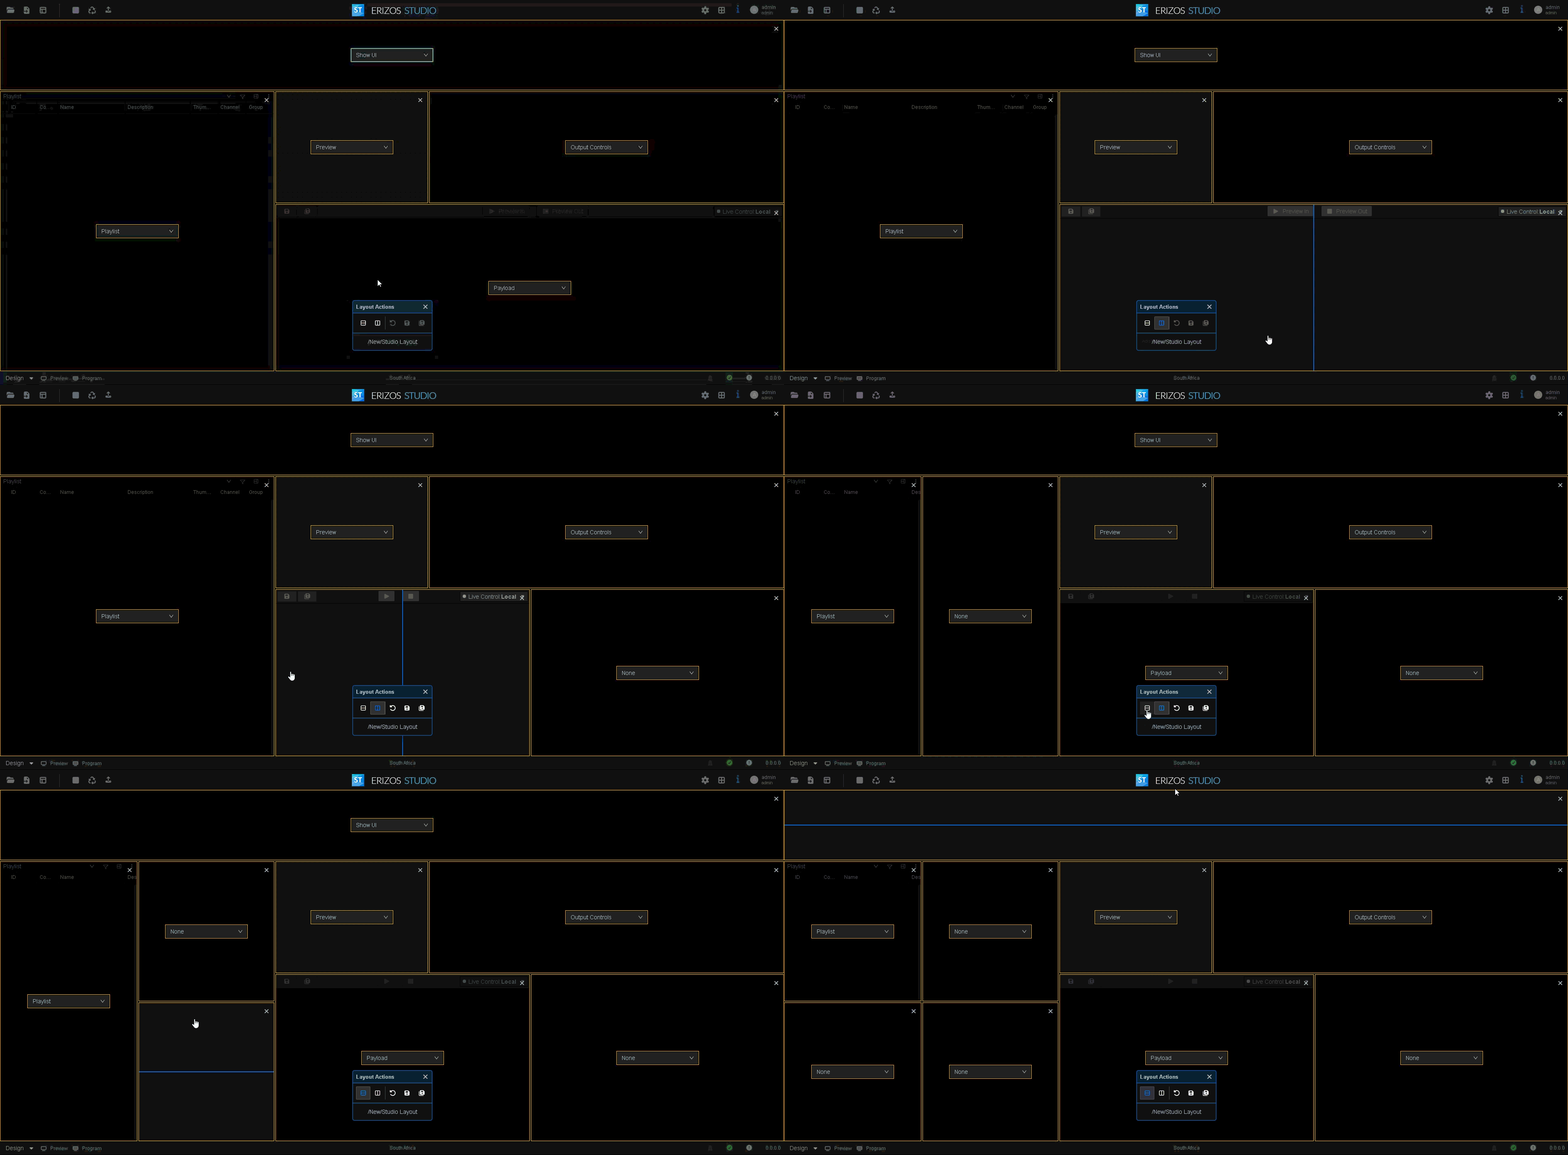
Splitting a panel is a two-step action:
- Click Add horizontal splitter or Add vertical splitter on the toolbar. The button highlights to show the split mode is now active. Clicking it again turns split mode off.
- Click the panel you want to split. The panel divides into two, and the new panel starts with its component set to None.
Note
A panel smaller than 500 × 250 pixels cannot be split. Its overlay is drawn as disabled and clicking it does nothing - make the panel bigger, or split one of its neighbours instead.
Resizing panels
Drag the divider between two panels to resize them and give each component more or less space.
Saving a layout
When you are happy with the arrangement, click Save on the Layout Actions toolbar. Studio asks Are you sure you want to save and overwrite the current layout? and, once you confirm, saves it and leaves edit mode.
To keep the original layout and save your version separately, use Save as instead. That asks Are you sure you want to save this layout as new?, creates a second layout, and reopens the Layout Manager on it.
Discarding changes
The Layouts Manager guards against losing work by accident:
- Reset to default asks you to confirm before discarding your changes. It returns the layout to the state it was in when you started the current editing session.
- If you close edit mode with unsaved changes, Studio prompts before exiting. You leave edit mode either with the in the header of the Layout Actions toolbar, or by pressing Esc.
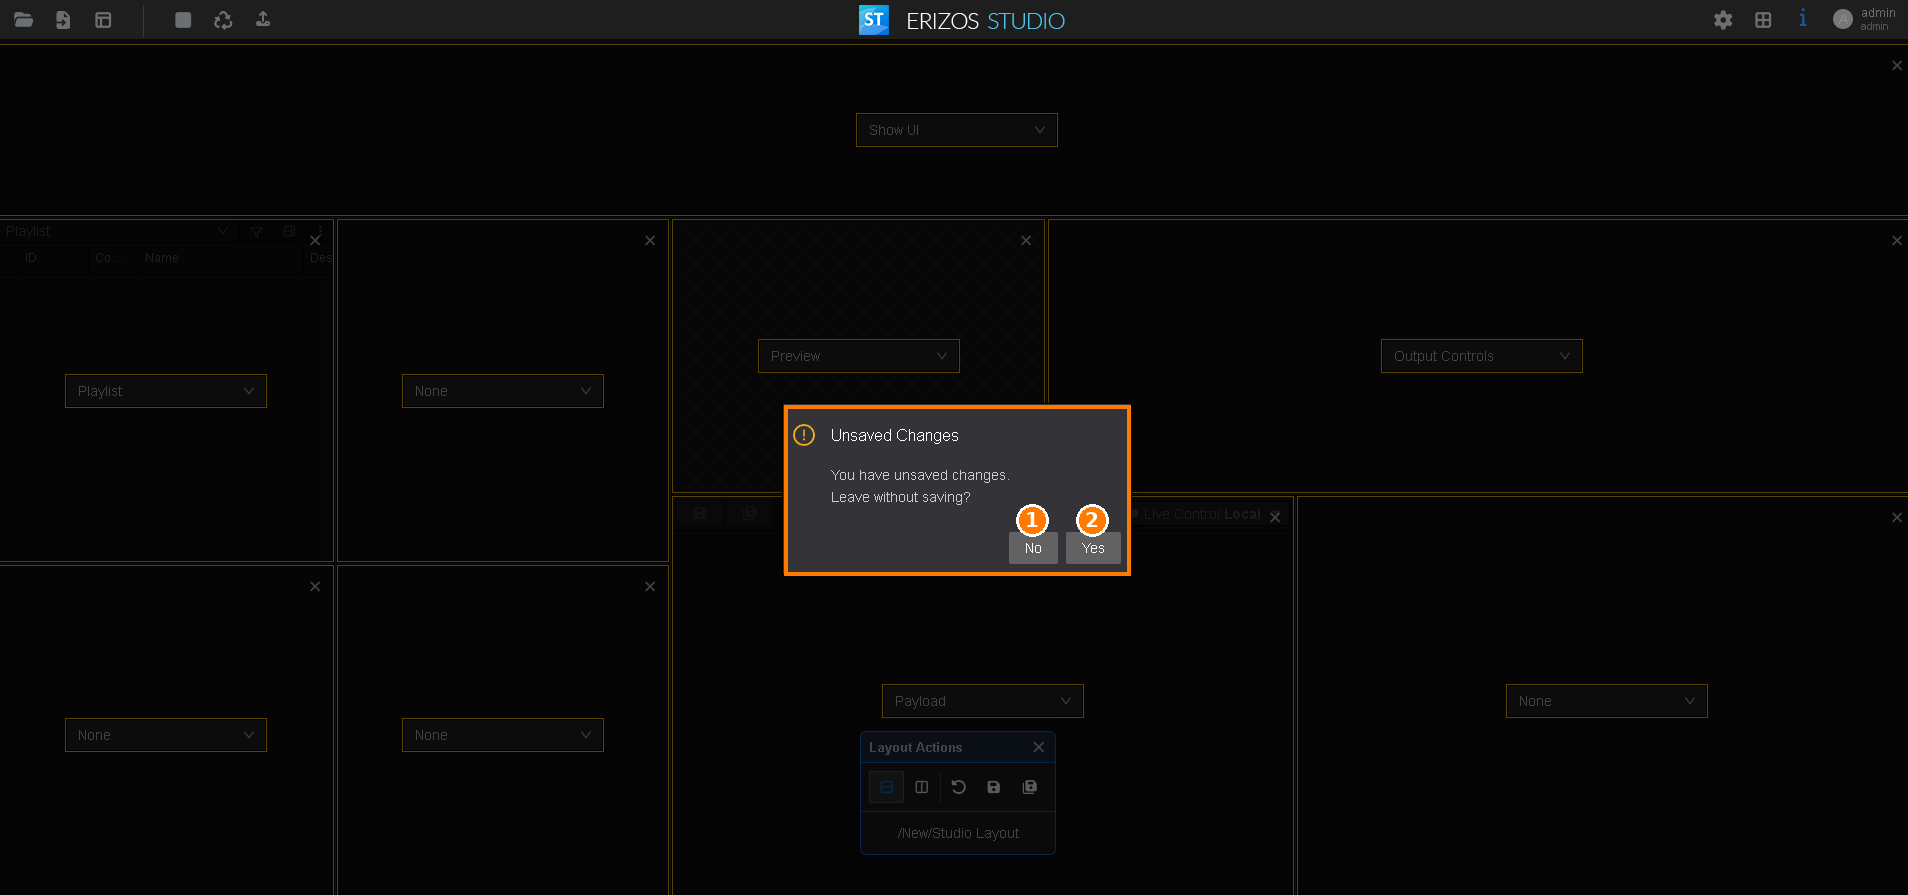
- No - go back and keep editing.
- Yes - leave edit mode and discard the unsaved changes.